

Facial oil recipes for dry skin should start with how your skin feels and what you want from the finished blend. Perhaps your cheeks feel tight after washing, your foundation catches on flaky patches, or shaving leaves your face uncomfortable. You want softer skin, but that doesn’t mean you want a shiny face and a sticky pillow.
These four blends give you different places to start. There are no essential oils in the recipes. The vegetable oils have plenty to contribute without them.
Want to keep these recipes handy? You’ll find a free, one-page download with all four blends at the end of this post.
Choosing Facial Oil Recipes for Dry Skin
Dryness can develop with age, cold weather, frequent washing or products that your skin doesn’t get on with. If your cleanser leaves your face feeling stripped, changing that is part of the job. Pouring more oil on afterwards won’t make the cleanser any kinder.
An oil blend can soften the skin and help it retain existing moisture. It doesn’t supply water, so you may still want a moisturiser underneath.
You don’t need every Omega in every bottle. What matters is why each oil is there and how the combination feels.
You can also explore my Vegetable Oils articles to get to know the individual oils and what they bring to your skincare.
Each recipe below makes 100 g. The percentages are included so you can see the balance clearly. Choose one to begin with; there’s no need to make the whole collection.
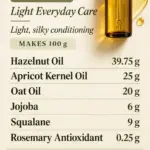
Dry Skin #1: Light Everyday Care
If your skin has dry patches but you dislike a noticeable oily layer, start here. Perhaps your foundation looks powdery around your cheeks, or you want something comfortable after shaving that doesn’t leave your face gleaming.
This blend aims for a light, silky application and a softly conditioned finish. Use it sparingly. Its behaviour beneath make-up will depend on your foundation, moisturiser and how much you apply.
- Hazelnut is the main oil because of its fine texture and relatively dry finish. It supplies mainly Oleic Acid (Omega-9), with some Linoleic Acid (Omega-6), giving softness without choosing a particularly heavy foundation for the blend.
- Apricot Kernel adds smooth spreading slip. Its fatty acids overlap with Hazelnut’s, but its extra job here is to make the application softer and more comfortable.
- Oat brings a velvety feel to balance those two oils. Its Oleic Acid (Omega-9) and Linoleic Acid (Omega-6) contribute to the conditioning, while its texture is the particular reason I’ve included it.
- Jojoba is kept at a modest level. This liquid wax adds a little lasting surface conditioning without becoming the main character.
- Squalane makes the combination feel lighter and more elegant. It has no Omega fatty-acid profile, and it doesn’t need one to be useful.
Recipe
- Hazelnut Oil: 39.75% / 39.75 g
- Apricot Kernel Oil: 25% / 25 g
- Oat Oil: 20% / 20 g
- Jojoba: 6% / 6 g
- Squalane: 9% / 9 g
- Rosemary Antioxidant: 0.25% / 0.25 g
- Total: 100% / 100 g
Cold blend using the method below. For daytime use or after shaving, begin with a very small amount. Avoid freshly nicked or broken skin, and let the oil settle before applying make-up.
Dry Skin #2: Fuller Care for Persistent Dryness
Your usual moisturiser feels lovely when it goes on, but a few hours later your cheeks are tight again. Your skin may have become drier as you’ve got older, and the lightest oils no longer leave it comfortable enough.
This could be a fuller evening option for a woman whose skin has become less supple, or a man whose rough, dry cheeks need more than his usual light aftershave product. The skin’s needs matter more than the label on the bottle.
- Camelina supplies a substantial Alpha-Linolenic Acid (Omega-3) contribution, alongside Linoleic Acid (Omega-6). It gives this blend a different fatty-acid emphasis from simply combining several richer oils.
- Borage brings Gamma-Linolenic Acid, usually called GLA, which belongs to Omega-6. Its relatively concentrated GLA content lets us use a smaller proportion than we might choose with Evening Primrose.
- Avocado adds the fuller softness. It contains mainly Oleic Acid (Omega-9), some Palmitoleic Acid (Omega-7), and minor components including plant sterols. At 15%, it gives the finer oils some substance without taking over.
- Rice Bran supplies smooth softening and naturally occurring tocopherols, tocotrienols and gamma-oryzanol. These constituents are part of its appeal, but they don’t replace the added antioxidant.
- Jojoba rounds out the blend with wax-based conditioning and a relatively oxidation-resistant component. The intended finish is supple and comfortable, with a little more presence and sheen than #1.
Recipe
- Camelina Oil: 30% / 30 g
- Borage Oil: 10% / 10 g
- Avocado Oil: 15% / 15 g
- Jojoba: 24.75% / 24.75 g
- Rice Bran Oil: 20% / 20 g
- Rosemary Antioxidant: 0.25% / 0.25 g
- Total: 100% / 100 g
Use the cold-blending method below. Apply a small amount over your evening moisturiser, concentrating on the areas that need it. You want comfortable skin, not enough oil to dress a salad.
Dry Skin #3: Simple Care for Flaky, Uncomfortable Skin
If your skin has become dry, flaky and easily upset, a complicated recipe may be the last thing you want. Perhaps a new cleanser hasn’t suited you, or frequent washing and shaving have left your face feeling tight.
This blend has just three oils. The aim is soft, velvety conditioning without a heavy, sticky coating. If a product is causing the irritation, stop using it rather than expecting a facial oil to cancel it out.
- Thistle, also called Safflower, supplies plenty of Linoleic Acid (Omega-6). I’ve chosen the linoleic type here. Linoleic Acid has an important role in the skin’s barrier lipids, giving Thistle a purpose beyond its light texture.
- Evening Primrose adds GLA as well as more Linoleic Acid (Omega-6). Although it overlaps with Thistle, its direct GLA contribution earns its place. Its fine, soft texture suits the comfortable application we want here.
- Oat balances the finer, drier oils with softness and a velvety finish. At 40%, it is a substantial part of the formula, rather than a little extra added for the label.
Recipe
- Thistle Oil: 39.75% / 39.75 g
- Evening Primrose Oil: 20% / 20 g
- Oat Oil: 40% / 40 g
- Rosemary Antioxidant: 0.25% / 0.25 g
- Total: 100% / 100 g
Cold blend as described below. Press a little onto slightly damp skin or over a moisturiser you already tolerate, without rubbing sore areas. This is conditioning skincare, not a treatment for every cause of redness, itching or flaking.
Dry Skin #4: Silky, Velvety Comfort
Your skin feels less supple than it used to, with rough patches that need a little more attention. You enjoy a soft finish that lasts, but don’t want a greasy coating.
You might wear make-up only occasionally and prefer a comfortable bare face. You might shave, keep a beard, or do neither. This is for the dry skin underneath, with a smooth application and a little lasting softness.
- Tigernut supplies silky conditioning, mainly through its Oleic Acid (Omega-9)-rich composition, with some Linoleic Acid (Omega-6). It forms the softening foundation of this blend.
- Meadowfoam contributes smooth lubrication and good oxidative stability. Its unusual long-chain fatty acids distinguish it from the other oils. Here it helps create a comfortable finish rather than a blend that feels fleeting.
- Oat adds the velvety character. Alongside Tigernut’s silkiness and Meadowfoam’s glide, it gives us a reason to expect a softer, more cushioned feel.
- Rosehip supplies Linoleic Acid (Omega-6) and Alpha-Linolenic Acid (Omega-3), with a drier sensory character to balance the other ingredients. I’ve kept it at 18%, rather than making this a Rosehip-dominated blend.
Recipe
- Tigernut Oil: 34.75% / 34.75 g
- Meadowfoam Seed Oil: 26% / 26 g
- Oat Oil: 21% / 21 g
- Rosehip Seed Oil: 18% / 18 g
- Rosemary Antioxidant: 0.25% / 0.25 g
- Total: 100% / 100 g
Apply a small amount to clean, slightly damp skin, or over your usual moisturiser. Spread it gently across your face and neck, giving any rough patches a little extra attention. Start sparingly and let it settle before deciding whether you need more. Your skin should feel soft and comfortable, with a slight sheen rather than an oily coating.
Making and Looking After Your Blend
You need clean, completely dry utensils, a small glass beaker, suitable bottles and scales capable of accurately weighing 0.25 g. My Tools & Equipment for Making DIY Skincare Products at Home guide covers the equipment.
- Weigh the oils into your beaker, using the tare function between additions.
- Weigh in the rosemary antioxidant and stir thoroughly, scraping around the sides and bottom.
- Transfer into clean, dry bottles and close immediately.
- Label with the blend number, ingredients and date made.
There is no heating needed. If an ingredient has thickened in a cold room, let it return to a normal room temperature before weighing.
The 0.25% antioxidant is the amount chosen for the specific rosemary extract used in these recipes. Rosemary antioxidant is not Rosemary Essential Oil. It slows oxidation; it is not an antimicrobial preservative.
These water-free blends normally don’t need an antimicrobial preservative when water is kept out. Don’t add hydrosols, aloe juice or other watery ingredients to the bottle.
Store each blend tightly closed, away from heat and direct sunlight, and keep wet fingers and dropper tips out of it. Freshness depends on the starting oils, their condition and storage, so I won’t give you a guaranteed shelf life. A stale, paint-like or otherwise rancid smell means it is time to discard it.
Try a small area first, particularly if your skin is easily irritated or you have a relevant ingredient allergy. Stop if it stings or worsens irritation. Persistent, worsening or broken skin needs appropriate assessment rather than more experimenting.
Conclusion
Choose the blend that sounds like your skin and the finish you enjoy. #1 is the lighter everyday option, #2 offers fuller conditioning, #3 keeps things simple for flaky, uncomfortable skin, and #4 aims for silky, velvety softness.
Start with a little. Notice how your skin feels after application and later in the day. You can always apply a little more; you don’t need to begin with a shiny face.
Keep the Recipes
Download all four facial oil recipes for dry skin on one printable page, with percentages, gram weights and the making method.
FAQ
What is the best facial oil for dry skin?
The best choice depends on how dry your skin feels and the finish you enjoy. Oat offers velvety softness, Avocado adds richer conditioning, and Jojoba helps retain moisture. A blend lets you balance those qualities without relying on one oil to do everything.
Can I mix different oils together for my face?
Yes. Choose oils that contribute something useful, such as softness, essential fatty acids or a lighter finish. Three well-chosen oils can make a lovely blend. Adding more ingredients doesn’t automatically make it better.
Can facial oil replace my moisturiser?
Not always. Facial oil softens the skin and helps reduce moisture loss, but it doesn’t supply water. If your skin still feels tight, apply your usual moisturiser first, followed by a small amount of oil.
How do I use facial oil without looking greasy?
Start with a small amount and spread it over slightly damp skin or moisturiser. Let it settle before adding more. If your face stays oily or shiny, try using less or choosing a lighter blend.
Does homemade facial oil need a preservative?
A blend made entirely from oils normally doesn’t need an antimicrobial preservative when water is kept out. An antioxidant helps slow rancidity, which is a different job. Adding aloe juice, hydrosols or other watery ingredients changes the formulation and its preservation needs.

If you liked this blog post, I would love it if you shared it with a friend.
If you use Pinterest, please pin this post.